> ## Documentation Index
> Fetch the complete documentation index at: https://docs.beyondwords.io/llms.txt
> Use this file to discover all available pages before exploring further.

# Playlists

export const DynamicPlaylistDemo = () => {
  const ITEMS_KEY = "bw-playlist-items";
  const PROJECT_ID_KEY = "bw-project-id";
  const PROJECT_ID_DEFAULT = 9504;
  const ITEMS_DEFAULT = [{
    contentId: "fab4bb2e-4903-4248-8062-0c7955603c15"
  }, {
    contentId: "e9536c9b-8d69-4195-9997-af7811b35276"
  }, {
    sourceId: "69dcf05546c4f3000197c3e8"
  }];
  const saveToStorage = (key, value) => {
    localStorage.setItem(key, JSON.stringify(value));
    return value;
  };
  const getFromStorage = key => {
    if (!key) return undefined;
    const items = localStorage.getItem(key);
    if (items) return JSON.parse(items);
    return undefined;
  };
  const [isReady, setIsReady] = useState(false);
  const [enteredId, setEnteredId] = useState("");
  const [loadedItems, setLoadedItems] = useState([]);
  const [inputType, setInputType] = useState("contentId");
  const [items, setItems] = useState(getFromStorage(ITEMS_KEY) || ITEMS_DEFAULT);
  const [projectId, setProjectId] = useState(getFromStorage(PROJECT_ID_KEY) || PROJECT_ID_DEFAULT);
  useEffect(() => {
    const handleReady = () => setIsReady(true);
    if (window.BeyondWords) handleReady(); else window.addEventListener("BeyondWordsReady", handleReady);
    return () => window.removeEventListener("BeyondWordsReady", handleReady);
  }, []);
  useEffect(() => {
    let player;
    if (!isReady) return;
    window.BeyondWords.Player.destroyAll();
    if (items.length) {
      player = new window.BeyondWords.Player({
        playlist: items,
        widgetStyle: "none",
        projectId: projectId,
        target: "#bw-playlist",
        analyticsConsent: "none"
      });
      player.addEventListener("ContentAvailable", () => {
        setLoadedItems(window.BeyondWords.Player.instances()[0].properties().content);
      });
    }
    return () => player?.destroy();
  }, [items, projectId, isReady]);
  if (!isReady) {
    return <div className="border p-4 rounded-xl font-bold text-center">
        Loading...
      </div>;
  }
  return <div className="border p-4 rounded-xl flex flex-col">
      <div className="mb-2.5 flex justify-between gap-1 md:items-center">
        <div className="flex gap-2">
          <span>Project ID: </span>
          <input type="text" value={projectId} placeholder="Project ID here" onChange={e => {
    const value = e.target.value;
    if (!(/^\d*$/).test(value) || value.length > 8) return;
    if (value !== getFromStorage(PROJECT_ID_KEY)) setItems(saveToStorage(ITEMS_KEY, []));
    setProjectId(saveToStorage(PROJECT_ID_KEY, value));
  }} className="px-2 py-1 text-xs border-2 rounded-md focus:outline-none focus:border-purple-600 max-sm:w-28" />
        </div>
        <select value={inputType} onChange={e => setInputType(e.target.value)} className="px-2 py-1 text-xs border-2 rounded-md focus:outline-none focus:border-purple-600">
          <option value="contentId">Content ID</option>
          <option value="sourceId">Source ID</option>
          <option value="sourceUrl">Source URL</option>
        </select>
      </div>
      <div className="mb-4 flex gap-2 max-sm:flex-col">
        <input type="text" value={enteredId} onChange={e => setEnteredId(e.target.value)} className="w-full px-2 py-1 border-2 rounded-md focus:outline-none focus:border-purple-600" placeholder={`Enter ${inputType === "contentId" ? "content ID" : inputType === "sourceId" ? "source ID" : "source URL"}`} />
        <div className="flex justify-center gap-2 max-sm:flex-row-reverse">
          <button onClick={() => {
    if (enteredId) {
      setEnteredId("");
      if (items.some(item => item[inputType] === enteredId)) window.alert("Identifier already added!"); else setItems(saveToStorage(ITEMS_KEY, [...items, {
        [inputType]: enteredId
      }]));
    }
  }} className="bg-black dark:bg-white font-bold text-white dark:text-black rounded-full px-4 py-1 max-sm:basis-1/2">
            Add
          </button>
          <button onClick={() => {
    setEnteredId("");
    setInputType("contentId");
    setItems(saveToStorage(ITEMS_KEY, ITEMS_DEFAULT));
    setProjectId(saveToStorage(PROJECT_ID_KEY, PROJECT_ID_DEFAULT));
  }} className="bg-black dark:bg-white font-bold text-white dark:text-black rounded-full px-4 py-1 max-sm:basis-1/2">
            Reset
          </button>
        </div>
      </div>
      <div id="bw-playlist"></div>
      {items.length > 0 && <>
          <div className="mt-4">
            <details className="border rounded-lg px-4 py-2 mb-2">
              <summary className="before:ml-1 cursor-pointer font-semibold">Added identifiers</summary>
              <p className="mb-4 block text-xs">Identifiers in red had some error while loading.</p>
              {items.map((item, index) => {
    const isError = loadedItems.length === 0 || !loadedItems.some(i => i.id === item.contentId || i.sourceId === item.sourceId || i.sourceUrl === item.sourceUrl);
    return <p key={index} className="mb-2 block text-sm text-gray-600">
                    <code className={isError ? "text-red-600 dark:text-red-300" : undefined}>
                      {item.contentId || item.sourceId || item.sourceUrl}
                    </code>
                    {item.contentId && <span className="dark:text-gray-200"> (as content ID)</span>}
                    {item.sourceId && <span className="dark:text-gray-200"> (as source ID)</span>}
                    {item.sourceUrl && <span className="dark:text-gray-200"> (as source URL)</span>}
                  </p>;
  })}
            </details>
          </div>
          <div className="flex justify-end gap-2 mt-2">
            <button onClick={() => setItems(saveToStorage(ITEMS_KEY, items.slice(0, -1)))} className="text-xs bg-black dark:bg-white font-bold text-white dark:text-black rounded-full px-3.5 py-2">
              Remove last item
            </button>
            <button onClick={() => setItems(saveToStorage(ITEMS_KEY, []))} className="text-xs bg-black dark:bg-white font-bold text-white dark:text-black rounded-full px-3.5 py-2">
              Clear all
            </button>
          </div>
        </>}
      {items.length === 0 && <div className="text-sm font-bold text-center mt-2">
          No audios to show. Please add some or hit reset.
        </div>}
    </div>;
};

Playlists let you group multiple audio or video items into a single experience, or enable users to create their own media queues.

There are three types of playlists in BeyondWords:

* [**Standard**](#create-a-standard-playlist): Manually select which content items to include
* [**Smart**](#create-a-smart-playlist): Set rules to automatically include relevant content items
* [**Dynamic**](#create-a-dynamic-playlist): Let users curate their own playlists (requires working in JavaScript)

<Info>
  Each standard/smart playlist automatically generates a corresponding [podcast feed](/docs-and-guides/distribution/podcast-feeds), and vice versa.
</Info>

<Tip>
  You might want to use [continuous playback](/docs-and-guides/distribution/player/player-settings#continuous-playback) as an alternative to playlists. This means the player automatically plays your most recent content items after the initial item ends.
</Tip>

## Create a standard playlist

Standard playlists are made up of items you choose and stay the same unless you update them manually. This is useful for grouping related coverage on a single story, creating daily roundups, or curating other kinds of fixed editorial collections.

<Steps>
  <Step title="Go to playlist settings">
    Go to **Distribution** → **Playlists** in your project dashboard
  </Step>

  <Step title="Create a new playlist">
    Click **+ Playlist** and fill out the form:

    * **Title**: Name your playlist
    * **Content limit**: Enter the maximum number of items to include in the playlist (up to 100)
    * **Image** (optional): Upload a square image to represent your playlist
    * **Type of playlist**: Select **Standard**

    Once complete, click **Continue**.
  </Step>

  <Step title="Select content to include">
    Click **Select articles** and use the checkboxes to decide which content to include.

    Once complete, click **Save changes**.
  </Step>

  <Step title="Change playlist order (optional)">
    To change the order of your playlist contents, click **••• → Reorder**
  </Step>
</Steps>

## Create a smart playlist

Smart playlists update automatically based on rules you define, allowing you to deliver a continuously refreshed feed of themed content. For example, you can include all the audio articles by a specific author, or all the videos related to a particular topic.

<Steps>
  <Step title="Go to playlist settings">
    Go to **Distribution → Playlists** in your [project dashboard](/docs-and-guides/get-started/projects).
  </Step>

  <Step title="Create a new playlist">
    Click **+ Playlist** and fill out the form:

    * **Title**: Name your playlist
    * **Content limit**: Enter the maximum number of items to include in the playlist (up to 100)
    * **Image** (optional): Upload a square image to represent your playlist
    * **Type of playlist**: Select **Smart**

    Once complete, click **Continue**.
  </Step>

  <Step title="Set playlist rules">
    By default, smart playlists include all items in your project. To change this, click **Set rules** then **+ Rule**.

    Use the **Field**, **Condition**, and **Value** fields to create your rule. For example, you may wish to create the rule `author is Joe Bloggs`.

    Once you're happy, click **Apply**.
  </Step>

  <Step title="Save changes">
    You can add as many rules as needed, combining them with `and` or `or` operators.

    The **Preview** section shows which items will be included based on your current content and rules.

    Once you’re happy, click **Save changes**.
  </Step>
</Steps>

## Embed a playlist

To embed a smart or standard playlist:

<Steps>
  <Step title="Go to playlist settings">
    Go to **Distribution** → **Playlists** in your [project dashboard](/docs-and-guides/get-started/projects).
  </Step>

  <Step title="Select a playlist">
    Click **•••** alongside the playlist you'd like to embed, then select **Get embed code**.
  </Step>

  <Step title="Copy embed code">
    Choose the content type you'd like to include in your playlist (audio article, audio summary, video article, or video summary).

    You'll see a preview of your playlist in the space below.

    <Warning>
      Your playlist will remain empty if you haven't generated the corresponding content type.
    </Warning>

    Once you're happy, click the **Copy** icon on the embed code.
  </Step>

  <Step title="Paste the embed code">
    Paste and save the embed code into the desired location on your website.

    ```html theme={null}
    <script async defer src="https://proxy.beyondwords.io/npm/@beyondwords/player@latest/dist/umd.js"
      onload="new BeyondWords.Player({
        target: this,
        projectId: YOUR_PROJECT_ID,
        playlistId: YOUR_PLAYLIST_ID
      })">
    </script>
    ```
  </Step>
</Steps>

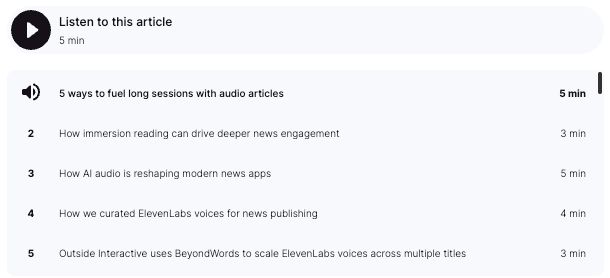
<Info>
  The playlist player inherits the same colors and call to action as your main player. These are controlled in [player settings](/docs-and-guides/distribution/player/player-settings).

  <Frame>
    <img src="https://mintcdn.com/beyondwords/OU83Gvobt0y91PD6/images/BeyondWords-playlist-player.png?fit=max&auto=format&n=OU83Gvobt0y91PD6&q=85&s=964e31b70851a9689f2ab28eaf7414cb" alt="Beyond Words Playlist Player" width="610" height="278" data-path="images/BeyondWords-playlist-player.png" />
  </Frame>
</Info>

## Share a playlist via URL

To share a smart or standard playlist via URL:

1. Go to **Distribution → Playlists** in your [project dashboard](/docs-and-guides/get-started/projects)
2. Click **•••** alongside the playlist you'd like to share, then select **Copy shareable URL**
3. Paste your URL in the desired locations

<Info>
  The shareable URL page displays the project title, playlist image, content titles, content durations, and playback controls.
</Info>

## Create a dynamic playlist

Dynamic playlists are generated in real time using your own logic and data. For example, you can allow users to build their own playlists with an **add to queue** feature.

### Demo

Add content identifiers to build a playlist in real time. Your selections persist locally so you can experiment.

<DynamicPlaylistDemo />

<Steps>
  <Step title="Set up the JavaScript player">
    [Install the JavaScript player](/docs-and-guides/distribution/player/installation/javascript-sdk) on your website.
  </Step>

  <Step title="Store user selections">
    Implement backend logic to save the identifiers of content users add to their queue (e.g. `contentId`, `sourceId`, or `sourceUrl`), along with their type.
  </Step>

  <Step title="Initialize the player">
    You will need your `projectId` and content identifiers (e.g. `contentId`, `sourceId`, or `sourceUrl`) to load items.

    Pass the saved items into the player as a list of identifiers. Each item should include one identifier:

    ```js theme={null}
    import BeyondWords from '@beyondwords/player';

    new BeyondWords.Player({
      target: '#beyondwords-player',
      projectId: YOUR_PROJECT_ID, // required
      playlist: [
        {
          // include one of the following per item
          contentId: 'YOUR_CONTENT_ID',
          sourceId: "<SOURCE_ID>",
          sourceUrl: "<SOURCE_URL>",
          playlistId: YOUR_PLAYLIST_ID,
        },
        // ...more items
      ],
    });
    ```

    The player fetches the content and loads it as a playlist.

    Player settings are pulled from your project by default, but can be overridden via the configuration.
  </Step>
</Steps>

## Copy a playlist ID

You will need to copy a playlist ID (`playlistId`) when loading or referencing a specific playlist in the player SDK or [Playlists API](/api-reference/playlists/list)—for example, when initializing a player with a playlist or building dynamic playlists programmatically.

To copy a playlist ID:

1. Go to **Distribution → Playlists** in your project dashboard
2. Click **•••** alongside your chosen playlist
3. Click **Copy ID** and paste it where required

## FAQs

<AccordionGroup>
  <Accordion title="How do I edit a playlist?">
    To edit a smart or standard playlist:

    1. Go to **Distribution → Playlists** in your project dashboard
    2. Click **••• → Edit** alongside your chosen playlist
    3. Update your chosen settings then click **Save changes**
  </Accordion>

  <Accordion title="How do I delete a playlist?">
    To delete a smart or standard playlist:

    1. Go to **Distribution → Playlists** in your project dashboard
    2. Click **••• → Delete** alongside your chosen playlist
    3. Click **Delete** to confirm
  </Accordion>

  <Accordion title="How do I set a playlist as &#x22;private&#x22; or &#x22;public&#x22;?">
    To change privacy settings for a smart or standard playlist:

    1. Go to **Distribution → Playlists** in your project dashboard
    2. Click **Public** or **Private** alongside your chosen playlist
    3. Switch the toggle then click **Save changes**

    If your playlist is set to "public", it can be accessed via its shareable URL and any embeds. If it’s "private", it cannot be accessed this way.
  </Accordion>

  <Accordion title="Why am I not seeing any content in my playlist?">
    If you're not seeing any content in your playlist in BeyondWords, it may be because you have:

    * Created a standard playlist without adding any articles
    * Created a smart playlist with overly restrictive rules
    * Selected a content type (e.g. video articles) that you haven't yet generated

    If content appears in your playlist in BeyondWords but not through your distribution method, you may be on a legacy plan that doesn't support playlist distribution. [Contact support](/docs-and-guides/support/get-support) if you’d like to discuss upgrading.
  </Accordion>

  <Accordion title="Can I play an audio sting between items in a playlist?">
    Yes, you can use the outros feature to play an audio sting between items in a playlist:

    1. Go to **Distribution → Player** in your project dashboard
    2. Scroll down to the **Outro** section and click **Upload audio**
    3. Upload the transition sound you want to use
    4. Click **Save changes**

    Please note that the outro will also play on individual items, not just within playlists.
  </Accordion>

  <Accordion title="What happens if I delete or update my content?">
    If you update your content, the latest version will be reflected in the playlist after a short delay due to caching. If you delete content, it will no longer appear in the playlist.
  </Accordion>
</AccordionGroup>
